
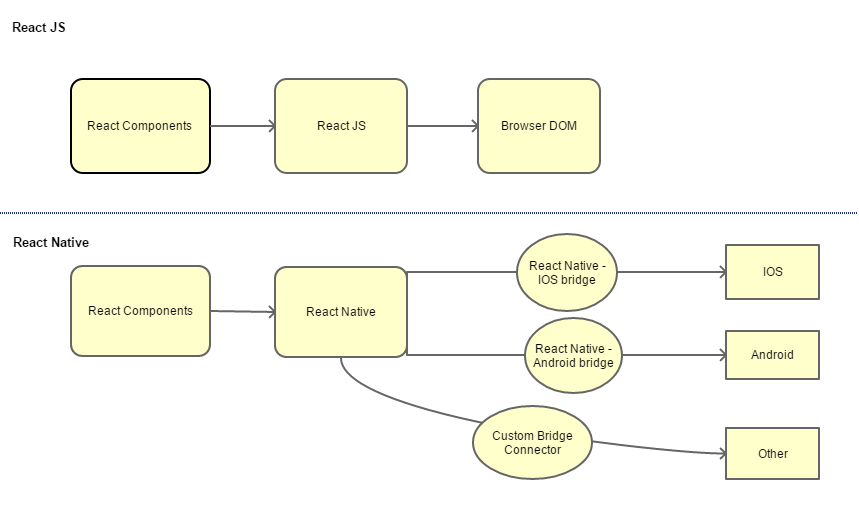
What is ReactJS

ReactJS is a JavaScript library that mixes the speed of JavaScript and uses the latest means that of rendering web-pages, making them very dynamic and aware of user input. The product considerably modified the Facebook approach to development. After the library was discharged as an open-source JavaScript tool in 2013, it became highly popular due to its revolutionary approach to programming user interfaces setting the long-going competition between React and Angular, another common web development tool.
Two years later, a constant cluster of engineers discharged React Native, a hybrid mobile app development substructure for iOS and Android. The tool was supported the exact same principles as ReactJS and shortly was accepted by the engineering community and corporations that adhere to the mobile-first strategy.
How does ReactJS Work
React creates a VIRTUAL DOM in memory.
Instead of manipulating the browser’s DOM directly, React creates a virtual DOM in memory, wherever it will all the mandatory manipulating, before creating the changes within the browser DOM.
React only changes what has to be changed!
React finds out what changes are created, and changes only what has to be modified.
React Components
Components are freelance and reusable bits of code. They serve identical purpose as JavaScript functions, however, add isolation and returns HTML via a render perform.
Components are available two varieties, category elements and performance components
- Create a Class Component:
When making a React element, the component’s name should begin with a character letter.
The element must embrace the extends React. Component statement, this statement creates an inheritance to React. Component, and offers your element access to React.Component’s functions.
The element additionally needs a render() technique, this technique returns HTML.
Now your React application has an element known as car, that returns a <h2> part.
To use this element in your application, use the similar syntax as normal HTML: < Car />
Example:
import React from ‘react’;
import ReactDOM from ‘react-dom’;
class Car extends React. Component {
render () {
return <h2> Hi, I am a Car! </h2 >;
}
}
ReactDOM.render(<Car/>,.getElementById(‘root’));
Output
Hi, I am a Car!
- Create a Function Component:
Here is that the same example as on top of, however, created employing a perform element instead.
A perform element additionally returns HTML, and behaves just about an equivalent means as a category element, however, category parts have some additions
Once again your React application features a car element.
Refer to the car element as normal HTML
Example:
import React from ‘react’;
import ReactDOM from ‘react-dom’;
function Car() {
return <h2> Hi, I am also a Car! </h2 >;
}
ReactDOM.render(<Car />, document.getElementById(‘root’));
Output
Hi, I am also a Car!
- Component Constructor
If there’s a constructor() operate in your element, this operate will be referred to as once the element gets initiated.
The creator operates is wherever you initiate the component’s properties.
In React, element properties should be unbroken in an object referred to as a state.
You will learn additional concerning state later during this tutorial.
The constructor operate is additionally wherever you honor the inheritance of the parent element by as well as the super() statement, that executes the parent component’s constructor operate, and your element has access to all the functions of the parent component (React.Component).
Example:
import React from ‘react’;
import ReactDOM from ‘react-dom’;
class Car extends React. Component
{
constructor()
{
super();
this.state = {color: “red”};
}
render()
{
return <h2> I am a {this.state.color} Car! </h2 >;
}
}
ReactDOM.render(<Car />, document.getElementById(‘root’));
Output
I am a red Car!
- Props
Another way of handling element properties is by using props.
Props are like operate arguments, and you send them into the element as attributes.
You will learn additional concerning props
Example:
import React from ‘react’;
import ReactDOM from ‘react-dom’;
class Car extends React. Component {
render() {
return <h2>I am a {this.props.color} Car!</h2 >;
}
}
ReactDOM.render(<Car color=”red”/>, document.getElementById(‘root’));
Output
I am a red Car!
- Components in Components
We can mention to components inside other components
Example:
import React from ‘react’;
import ReactDOM from ‘react-dom’;
class Car extends React. Component {
render() {
return <h2> I am a Car!</h2 >;
}
}
class Garage extends React. Component {
render() {
return (
<div>
<h1>Who lives in my Garage?</h1 >;
<Car />
</div>
);
}
}
ReactDOM.render(<Garage />, document.getElementById(‘root’));
Output
Who lives in my Garage?
I am a Car!
- Components in Files
React is all concerning re-using code, and it is often sensible to insert a number of your parts in separate files.
To do that, produce a brand new file with a .js file extension and place the code within it:
Note that the file should begin by mercantilism React (as before), and it’s to finish with the statement export default Car;
Example:
App.js
import React from ‘react’;
import ReactDOM from ‘react-dom’;
class Car extends React. Component {
render() {
return <h2>Hi, I am a Car!</h2>;
}
}
export default Car;
index.js
import React from ‘react’;
import ReactDOM from ‘react-dom’;
import Car from ‘./App.js’;
ReactDOM.render(<Car />, document.getElementById(‘root’));
Output
Hi, I am a Car!
Advantages of ReactJS
-
- Virtual DOM
DOM (document object model) is a logical structure of documents in HTML, XHTML, or XML formats. Describing it in layman’s terms, it’s a viewing agreement on information inputs and outputs, that contains a tree type. web browsers are using layout engines to rework or analyze the illustration HTML-syntax into a document object model, that we are able to see in browsers.
The main concern regarding ancient DOM construct is that the approach it processes changes, i.e., user inputs, queries, and so on. A server constantly checks the distinction caused by these changes to offer the required response. to reply properly, it also needs to update the DOM trees of the entire document, that isn’t ergonomically valid as a result of DOM trees are fairly massive nowadays, containing thousands of parts. The approach enabled developers to figure with UI-objects quicker and use hot reloading (applying changes in a time period mode). Not only did it increase performance, but it also created programming quicker.
-
- One-Direction Data Flow in ReactJS
ReactJS permits for direct work with parts and uses downward information binding to confirm that changes of kid structures don’t have an effect on their folks. that produces code stable. Most advanced view-model systems of JS-representation have a big but understandable disadvantage – the structure of information flow. within the view-model system, kid parts might have an effect on the parent if modified. Facebook removed these problems in React JS, creating it simply the read system.
-
- Permission to Recycle React Parts Considerably Saves Time
Another advantage that Facebook introduced with React is that the ability to recycle code parts of a distinct level anytime, another purposeful time-saving impact.
Think of designers. They constantly recycle similar assets. If they didn’t, they’d got to draw company logos, for example, over and yet again. It’s pretty obvious: Reusing is a style efficiency. In programming, this method is a bit tougher. System upgrades typically become a headache as each modification will affect the work of alternative parts within the system.
Managing updates is simple for developers as a result of all ReactJS parts are isolated and alter in one doesn’t have an effect on others. this permits for reusing parts that don’t manufacture changes in and of themselves to form programming a lot of precise, ergonomic, and cozy for developers
-
- An Open-Source Facebook Library
ReactJS was one in all the primary JavaScript-connected comes discharged as open-source by Facebook. meaning that ReactJS uses all benefits of free access – a lot of helpful applications and extra tools from off-company developers. Facebook’s Pete Hunt says that a minimum of two main options – batching and pruning – were created by developers that noticed the project on GitHub. currently ReactJS is 5th in Trending on GitHub with over 111,000 stars. And, there are over 1200 open-source contributors operating with the library.
-
- Redux
Before write an angry comment that revived is framework-agnostic and you’ll happily use it with Angular or Vue, which it isn’t exclusive to React some, please note that we all know that. However, it’s value mentioning revived here just because the tool is taken into account to be every-React-engineer’s must-learn instrument applied in concerning 60 % of React apps. Yes, you’ll use revived with Angular, however, the chance of a React developer knowing revived is way more than knowing Angular. And you’ll realize a lot of community support for grappling the React revived learning curve. So, why is it good?
-
- Wide React and Redux Toolset
Both React and revived escort a good set of connected tools that build a developer’s life easier. for example, React Developer Tools extension for Chrome and the same one for Firefox give examining part hierarchies within the virtual DOM and redaction states and properties. in addition, you’ll check React Sight that visualizes state and prop trees; Reselect DevTools that helps with debugging and visualizing Reselect, a selector library for revived. revived DevTools Profiler Monitor permits for identification actions in well… Chrome DevTools. And there is more to undertake.
Disadvantages of ReactJS
-
- High Pace of Development
This disadvantage is capably represented by developers Michael Jackson and Ryan Florence on trendy Web: “In case you didn’t notice we’re driving a car here with two flat tires, the hood simply flew up ahead of the screen, and that we haven’t any clue what’s happening anymore!” The setting constantly changes, and developers should frequently learn new ways of doing things. Everything is evolving, and a few developers don’t seem to be snug with maintaining at such a pace.
-
- Poor Documentation
The problem with documentation traces back to constant releases of recent tools. totally different and new libraries like revived and Reflux are promising to accelerate the work of a library or improve the complete React scheme. In the end, developers struggle with group action these tools with ReactJS. Some members of the community suppose that React technologies are changing and fast therefore quick that there’s no time to write down correct instruction. to resolve this, developers write their own documentation for specific tools utilized by them in current comes.
-
- ‘HTML in my JavaScript!’ – JSX as a barrier
ReactJS uses JSX. It’s a syntax extension, that permits commixture HTML with JavaScript. JSX has its own advantages (for instance, protective code from injections), however, some members of the event community think about JSX to be a significant disadvantage. Developers and designers complain regarding JSX’s quality and resultant steep learning curve.
-
- Extra SEO Problem
There are issues that Google and different search engines can’t index or poorly index dynamic sites with client-side rendering. These issues haven’t been absolutely established and there are exposure materials around. Google itself confirmed that their crawlers are capable of reading dynamic content. So, we tend to aren’t gonna say that your ReactJS app won’t be indexed by Google. It’s 2018 in spite of everything.
React Life-cycle
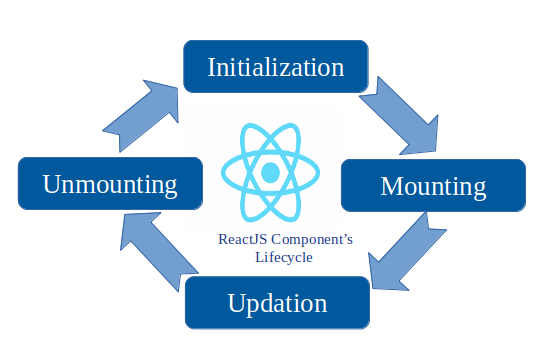
Each part in React features a life-cycle that you’ll be able to monitor and manipulate throughout its three main phases.
The three phases are:
- Mounting
- Updating
- Unmounting
- Mounting
Mounting suggests that golf shot components into the DOM.
React has four inbuilt strategies that get known as, during this order, once mounting a component:
- constructor()
- getDerivedStateFromProps()
- render()
- componentDidMount()
The render() methodology is needed and can continuously be known as the others are optional and can be known as if you outline them.
-
- constructor()
The constructor() methodology is termed before anything, once the element is initiated, and it’s the natural place to line up the initial state and different initial values.
The constructor() methodology is termed with the props, as arguments, and you must invariably begin by calling the super(props) before anything, this can initiate the parent’s builder methodology and permits the part to inherit strategies from its parent (React.Component).
Example:
import React from ‘react’;
import ReactDOM from ‘react-dom’;
class Header extends React. Component {
constructor(props) {
super(props);
this.state = {favoritecolor: “red”};
}
render() {
return (
<h1> My Favorite Color is {this.state.favoritecolor}</h1>
);
}
}
ReactDOM.render(<Header />, document.getElementById(‘root’));
Output
My Favorite Color is red
-
- getDerivedStateFromProps()
The getDerivedStateFromProps() methodology is named right before rendering the element(s) within the DOM.
This is the natural place to line the state object supported the initial props.
It takes the state as an argument and returns an object with changes to the state.
The example below starts with the favorite color being “red”, however, the getDerivedStateFromProps() methodology updates the favourite color supported the favcol attribute:
Example:
import React from ‘react’;
import ReactDOM from ‘react-dom’;
class Header extends React. Component {
constructor(props) {
super(props);
this.state = {favoritecolor: “red”};
}
static getDerivedStateFromProps(props, state) {
return {favoritecolor: props.favcol };
}
render() {
return (
<h1>My Favorite Color is {this.state.favoritecolor}</h1>
);
}
}
ReactDOM.render(<Header favcol=”yellow”/>, document.getElementById(‘root’));
Output
My Favorite Color is yellow
-
- render()
The render() technique is needed and is the technique that actual outputs HTML to the DOM.
Example:
import React from ‘react’;
import ReactDOM from ‘react-dom’;
class Header extends React. Component {
render() {
return (
<h1>This is the content of the Header component </h1>
);
}
}
ReactDOM.render( <Header />, document.getElementById(‘root’));
Output
This is the content of the Header component
- componentDidMount
The componentDidMount() technique is termed when the component is rendered.
This is wherever you run statements that need that the element is already placed within the DOM.
Example:
import React from ‘react’;
import ReactDOM from ‘react-dom’;
class Header extends React. Component {
constructor(props) {
super(props);
this.state = {favoritecolor: “red”};
}
componentDidMount() {
setTimeout(() => {
this.setState({favoritecolor: “yellow”})
}, 1000)
}
render() {
return (
<h1>My Favorite Color is {this.state.favoritecolor}</h1>
);
}
}
ReactDOM.render(<Header />, document.getElementById(‘root’));
Output
My Favorite Color is yellow
- Updating
The next innovate the lifecycle is once a part is updated.
An element is updated whenever there’s a modification within the component’s state or props.
React has five inbuilt strategies that get known as, during this order, once an element is updated:
- getDerivedStateFromProps()
- shouldComponentUpdate()
- render()
- getSnapshotBeforeUpdate()
- componentDidUpdate()
-
- getDerivedStateFromProps
Also at updates, the getDerivedStateFromProps methodology is termed. this can be the primary methodology that’s known as once an element gets updated.
This is still the natural place to line the state object that supported the initial props.
The example below features a button that changes the favorite color to blue, however since the getDerivedStateFromProps() methodology is termed, that updates the state with the color from the favcol attribute, the favorite color remains rendered as yellow:
Example:
import React from ‘react’;
import ReactDOM from ‘react-dom’;
class Header extends React. Component {
constructor(props) {
super(props);
this.state = {favoritecolor: “red”};
}
static getDerivedStateFromProps(props, state) {
return {favoritecolor: props.favcol };
}
changeColor = () => {
this.setState({favoritecolor: “blue”});
}
render() {
return (
<div>
<h1>My Favorite Color is {this.state.favoritecolor} </h1>
<button type=”button” onClick={this.changeColor}>Change color </button>
</div>
);
}
}
ReactDOM.render( <Header favcol=”yellow”/>, document.getElementById(‘root’));
Output
My Favorite Color is yellow
Change color
-
- shouldComponentUpdate
In the shouldComponentUpdate() methodology you’ll be able to come to a boolean price that specifies whether React should continue with the rendering or not.
The default price is true.
The example below shows what happens once the shouldComponentUpdate() methodology returns false:
Example:
import React from ‘react’;
import ReactDOM from ‘react-dom’;
class Header extends React. Component {
constructor(props) {
super(props);
this.state = {favoritecolor: “red”};
}
shouldComponentUpdate() {
return true;
}
changeColor = () => {
this.setState({favoritecolor: “blue”});
}
render() {
return (
<div>
<h1>My Favorite Color is {this.state.favoritecolor} </h1>
<button type=”button” onClick={this.changeColor}>Change color </button>
</div>
);
}
}
ReactDOM.render( <Header />, document.getElementById(‘root’));
Output
My Favorite Color is red
Change color (On click on Button)
My Favorite Color is blue
-
- render
The render() methodology is in fact known as once a part gets updated, it’s to re-render the HTML to the DOM, with the new changes.
The example below features a button that changes the favorite color to blue:
Example:
import React from ‘react’;
import ReactDOM from ‘react-dom’;
class Header extends React. Component {
constructor(props) {
super(props);
this.state = {favoritecolor: “red”};
}
changeColor = () => {
this.setState({favoritecolor: “blue”});
}
render() {
return (
<div>
<h1>My Favorite Color is {this.state.favoritecolor}</h1>
<button type=”button” onClick={this.changeColor}>Change color</button>
</div>
);
}
}
ReactDOM.render(<Header />, document.getElementById(‘root’));
Output
My Favorite Color is blue
Change color
-
- getSnapshotBeforeUpdate
In the getSnapshotBeforeUpdate() methodology you’ve got access to the props and state before the update, which means that even when the update, you’ll be able to check what the values were before the update.
If the getSnapshotBeforeUpdate() methodology is gift, you must also embody the componentDidUpdate() methodology, otherwise you’ll get an error.
The example below might sound difficult, however, all it will is this:
When the element is mounting it’s rendered with the favorite color “red”.
When the element has been mounted, a timer changes the state, and when one second, the favorite color becomes “yellow”.
This action triggers the update section, and since this element features a getSnapshotBeforeUpdate() methodology, this methodology is dead and writes a message to the empty DIV1 component.
Then the componentDidUpdate() methodology is dead and writes a message within the empty DIV2 element:
Example:
import React from ‘react’;
import ReactDOM from ‘react-dom’;
class Header extends React. Component {
constructor(props) {
super(props);
this.state = {favoritecolor: “red”};
}
componentDidMount() {
setTimeout(() => {
this.setState({favoritecolor: “yellow”})
}, 1000)
}
getSnapshotBeforeUpdate(prevProps, prevState) {
document.getElementById(“div1”).innerHTML =
“Before the update, the favorite was ” + prevState.favoritecolor;
}
componentDidUpdate() {
document.getElementById(“div2”).innerHTML =
“The updated favorite is ” + this.state.favoritecolor;
}
render() {
return (
<div>
<h1>My Favorite Color is {this.state.favoritecolor}</h1>
<div id=”div1″></div>
<div id=”div2″></div>
</div>
);
}
}
ReactDOM.render(<Header />, document.getElementById(‘root’));
Output
My Favorite Color is yellow
Before the update, the favorite was red
The updated favorite is yellow
- componentDidUpdate
The componentDidUpdate methodology is named when the component is updated within the DOM.
The example below might sound difficult, however, all it will is this:
When the element is mounting it’s rendered with the favorite color “red”.
When the element has been mounted, a timer changes the state, and therefore the color becomes “yellow”.
This action triggers the update section, and since this element features a componentDidUpdate methodology, this methodology is dead and writes a message within the empty DIV element:
Example:
import React from ‘react’;
import ReactDOM from ‘react-dom’;
class Header extends React. Component {
constructor(props) {
super(props);
this.state = {favoritecolor: “red”};
}
componentDidMount() {
setTimeout(() => {
this.setState({favoritecolor: “yellow”})
}, 1000)
}
componentDidUpdate() {
document.getElementById(“mydiv”).innerHTML =
“The updated favorite is ” + this.state.favoritecolor;
}
render() {
return (
<div>
<h1>My Favorite Color is {this.state.favoritecolor} </h1>
<div id=”mydiv”> </div>
</div>
);
}
}
ReactDOM.render( <Header />, document.getElementById(‘root’));
Output
My Favorite Color is yellow
The updated favorite is yellow
- Unmounting
The next innovate the lifecycle is once a part is faraway from the DOM, or unmounting as React likes to decision it.
React has just one inbuilt methodology that gets known as once an element is unmounted:
- componentWillUnmount()
- componentWillUnmount
The componentWillUnmount method is called when the component is removed from the DOM.
Example:
import React from ‘react’;
import ReactDOM from ‘react-dom’;
class Container extends React.Component {
constructor(props) {
super(props);
this.state = {show: true};
}
delHeader = () => {
this.setState({show: false});
}
render() {
let myheader;
if (this.state.show) {
myheader = ;
};
return (
<div>
{myheader}
<button type=”button” onClick={this.delHeader}>Delete Header</button>
</div>
);
}
}
class Child extends React. Component {
componentWillUnmount() {
alert(“The component named Header is about to be unmounted.”);
}
render() {
return (
<h1>Hello World!</h1>
);
}
}
ReactDOM.render(<Container />, document.getElementById(‘root’));
Output
Hello World!
Delete Header
On click of(button)
Why to Choose ReactJS?

-
- Easy Integration
Existence a library and not a framework dedicated to the occurrence of web applications, React also can be integrated into existing projects for the event of targeted elements. Its use is additionally freelance of the technological stack of the project. be happy to speak to our hire ReactJS developer for integration functions.
-
- Virtual DOM
It is an abstraction in memory of the elements of the UI. It offers economical management of changes within the DOM. due to the selective rendering of sub-trees of the DOM at every modification of state. For this purpose, it uses an algorithm that permits it to spot only the elements that are subject to the current modification.
-
- Libraries & Growing Communities
It offers integrative modules for routing management, application standing, testing and a bunch of ready-to-use libraries to address the foremost common issues and wishes. ReactJS abilities actually an outsized and active community of developers and counts among the user corporations prestigious names like Airbnb, Netflix, Paypal, Uber, Reddit, Asana, etc.
-
- Sharing the Code between Client & Server
Unlike different client-side libraries, React is an isomorphic library. This property permits the pages to be rendered additionally on the server-side, so causing the HTML to the browser that represents the initial state of the appliance. This guarantees versatility however at an equivalent time that the appliance is SEO friendly.
-
- JSX
It is an elective markup just like HTML. It permits the declarative description of the interface by combining the benefit of writing views with the ability of JavaScript. This syntax is meant to be utilized by Transmitters (e.g. Babel) to rework JSX markup (found in JavaScript files) into normal JavaScript objects.
Unlike within the past, rather than writing JavaScript in HTML, JSX permits us to insert HTML in JavaScript!
-
- One-Way Data Binding
It avoids the complexness of the two-way knowledge binding by process flow of mono-directional data (parent-child) and an explicit hierarchy of communication.
Top 10 ReactJS libraries you should know
- Create React App
- Material UI
- Styled Components
- MobX
- Enzyme
- Redux
- Redux Form
- React DnD
- React Virtualized
- React Intl
Conclusion:
I hope this blog has provided you with complete information about all the topics of ReactJS. Now, you have any idea regarding ReactJS Development and the way it works. If you come upon any problem during this tutorial feel free to contact us, be happy to share with you the idea & information about ReactJS, if you want dedicated ReactJS developer, to develop your native ReactJS application, hire ReactJS developer we can respond at the earliest.